I2CMotor Arduino Library
I2CMotor is an all-in-one packed motor with I2C connection that offers a compact solution for precise motor control, allowing you to easily adjust both speed and direction via simple I2C commands. The ability to change the slave address means you can connect multiple motors to the same I2C bus and control them independently, making it highly scalable for robotics or automation projects. This product simplifies wiring, reduces microcontroller pin usage, and enables seamless integration and expansion in complex systems, all while providing reliable and configurable motor management in a single module. Additionally, when paired with an ESP32-C3-based controller, it can be used through Wi-Fi and Bluetooth connectivity, expanding control options beyond wired I2C communication for wireless operation and enhanced flexibility in IoT and robotics applications.
Table of Contents
- Technical Drawings
- Features
- Hardware Components Used
- Installation
- Versatility
- Usage
- API Overview
- Example Serial Commands
- Notes
- Credits
- License
- Project Image
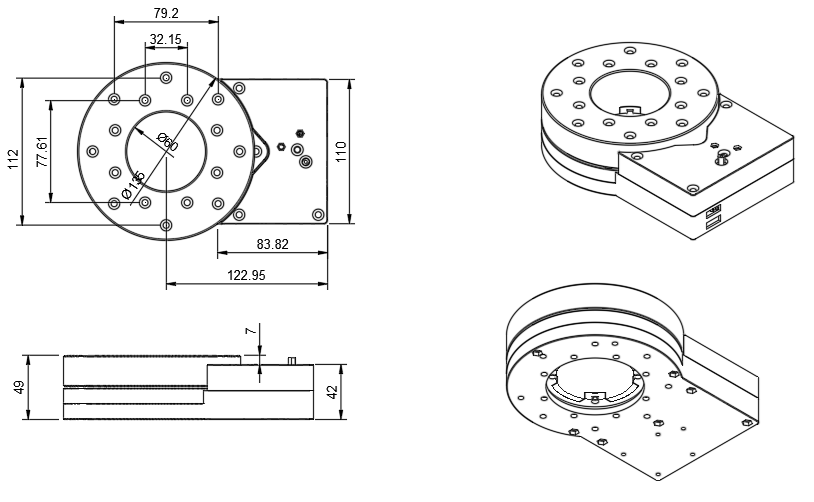
Technical Drawings
Features
- Vertical Load Handling: Utilizes a high-quality thrust bearing to efficiently support vertical (axial) loads, ensuring reliable performance in demanding applications.
- Donut Shape: Innovative donut-shaped design allows for pass-through of wires or shafts, simplifying cable management and enabling unique integration options.
- I2C Connectivity: Supports I2C communication for easy and precise control of motor speed and direction using simple digital commands.
- Configurable Slave Address: Allows the slave address to be changed, enabling multiple motors to operate independently on the same I2C bus.
- All-in-One Design: Combines motor, controller, and interface in a single compact unit, reducing wiring complexity and saving space.
- Scalable and Versatile: Ideal for robotics, automation, and projects requiring multiple motors or compact, integrated solutions.
- Easy Integration: Streamlined installation process with minimal wiring and configuration needed, perfect for both prototyping and production environments.
Hardware List
| Component | Purpose |
|---|---|
ESP32C3 Super Mini |
Stamp size microcontroller with BLE and WiFi Connectivity |
L298n |
Dual H-Bridge With Digital Control - For DC Motor Control |
Standard DC Motor |
Standard Brushed DC Motor With Gear Box |
Magnetic Encoder |
Optional - to leverage the use of a motor to work as a servo |
Installation
- Download or clone this repository.
- Copy the
I2CMotor, and related library folders to your Arduinolibrariesdirectory. - Restart the Arduino IDE.
File Overview
| File/Folder | Purpose |
|---|---|
I2CMotor.h/.cpp |
Arduino class for controlling a DC motor via I2C |
Master.ino |
Example sketch for I2C master (controller) |
Slave.ino |
Example sketch for I2C slave (motor driver) |
keywords.txt |
Arduino IDE syntax highlighting |
fablab_motor.jpg |
Project image |
Versatility
The I2CMotor offers exceptional versatility, as it can function as a standalone device and can be adapted to be USB-controlled instead of relying solely on I2C communication. This flexibility allows users to easily integrate the motor into a wide range of projects and control environments. Furthermore, the motor’s firmware can be reprogrammed to support Wi-Fi and Bluetooth connectivity, enabling wireless control and making it ideal for modern applications in robotics, automation, and IoT. This adaptability ensures that the I2CMotor can meet diverse requirements and evolve with your project’s needs.
Usage
1. Include the Library
#include "I2CMotor.h"
2. Master Example
-
Upload
Master.inoto your Arduino master device. -
Use the following functions to control and configure your motor:
-
motor.identify();
Scan and identify the connected motor. -
motor.setDeviceName("Name");
Assign a new name to the motor. -
motor.setMinMax(Min, Max);
Set the minimum and maximum speed limits for the motor. -
motor.setMotorDirection(MotorNum, Direction);
*Set the rotation direction for a specific motor.MotorNum: The number of the motor you want to control.Direction: Use1for clockwise,2for counter-clockwise.*
-
motor.setMotorSpeed(MotorNum, Speed);
*Set the speed for a specific motor.MotorNum: The number of the motor you want to control.Speed: Desired speed value.*
-
3. Slave Example
- Upload
Slave.inoto your Arduino slave device. - The slave listens for I2C commands to set motor speed/direction or change its own I2C address (persistently via EEPROM).
API Overview
| Method & Signature | Description | Example Usage |
|---|---|---|
begin() |
Initializes the I2C bus and prepares the library | motor.begin(); |
setAddress(uint8_t addr) |
Sets the target slave I2C address for all subsequent commands | motor.setAddress(0x08); |
setDeviceName(const char* name) |
Sets the device name on the slave (stored in EEPROM) | motor.setDeviceName("MyMotor"); |
identify() |
Requests and returns the identification string from the slave | String id = motor.identify(); |
motorControl(uint8_t motor, uint8_t spd, uint8_t dir) |
Controls a single motor (1=A, 2=B), speed (0-100), direction (0=FWD, 1=REV) | motor.motorControl(1, 80, 0); |
bothMotorsControl(uint8_t sa, uint8_t da, uint8_t sb, uint8_t db) |
Controls both motors at once: speeds and directions | motor.bothMotorsControl(100, 0, 80, 1); |
stopAllMotors() |
Stops both motors (sets speed to 0) | motor.stopAllMotors(); |
allStop() |
Emergency stop (hardware-level, all motors off) | motor.allStop(); |
scanI2CBusForMotors() (custom function) |
Scans the I2C bus for compatible motor controllers | scanI2CBusForMotors(); |
setSlaveAddress(uint8_t currAddr, uint8_t newAddr) (custom function) |
Sends address change command to the slave | setSlaveAddress(0x08, 0x09); |
Parameter Descriptions
- motor: 1 = Motor A, 2 = Motor B
- spd / sa / sb: Speed percentage (0-100)
- dir / da / db: Direction (0 = Forward, 1 = Reverse)
- addr / currAddr / newAddr: 7-bit I2C address (e.g., 0x08)
Typical Usage Flow
motor.begin();motor.setAddress(0x08);motor.setDeviceName("TestMotor");String id = motor.identify();motor.motorControl(1, 80, 0);motor.bothMotorsControl(100, 0, 80, 1);motor.stopAllMotors();motor.allStop();scanI2CBusForMotors();setSlaveAddress(0x08, 0x09);(then use new address for further commands)
Notes
- The default I2C address is
0x08. You can change it using the provided command. - The slave stores its address in EEPROM and will remember it after reset.
- Modify pin definitions in
Slave.inoas needed for your hardware.
Credits
Developed by FABLAB Bahrain.
License
This project is open-source; see the LICENSE file for details.